Thursday, December 31, 2009

Dino Update 2

Happy New Year to all!!! Here's the latest update. :)
Finished painting the metals and the details.

dinowip3

De stressed the edges of the armour using the sponging technique as well as painting in some chips as well.

dinowip4

Inked the armour and the Dino to create a darker more weathered look. :)

dinowip5

Tuesday, December 29, 2009

Dino Update

Here's the daily update. Didn't get too much done abit lazy. Painted the rough colours across most of the model (decided to focus on the dino 1st).

The Metals were decided and a basecoat of tin bits was applied for all the parts which i would later paint to become steel or gold. I find tin bits to have good coverage for the later metal paints i would be using later.

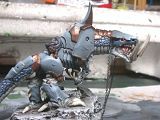
The underbelly of the beast was painted with a mixture of GW shadow grey + Vallejo US field drab. Then progressively lightened with Vallejo Deck Tan. This was done through layering. When i was done with this part i realized that it looked like a shark!!! Ok la... :P Anyway its gonna be on a snow base like all my other marines so i think it should be quite suited.

The interior of the mouth was painted and the highlighted. The details of the teeth and claws were then done in the usual manner.

The scales were then painted using shadow grey + black + midnight blue. And then lightened with shadow grey and finally lightened with space wol grey.

The eyes were a problem coz i decided for a green glow at 1st and then discovered that i didn't like it. Repainted over with red eyes instead.

Hopefully there will be more progress tomorrow. Thanks for watching. All your comments are much appreciated.

Dinowip2

Monday, December 28, 2009

Base Coated

Just returned from my holidays :) And back to work on the Dino Rider. A small update. The model was base coated with GW Chaos black spray and then airbrushed with Tamiya Sea Blue : Field Blue : Medium Blue : Sky Blue.

Now that the base colors are done. The next steps would be hand painting :)

Dino Basecoated

Dinorider Basecoated

Tuesday, December 22, 2009

Head Test

Just mucking about thanks to Kong. What about using chaos heads?
What do u guys think? Too chaotic?

chaoshead2

chaoshead1

Monday, December 21, 2009

DinoRider WIP2

Just a small update. Finally got the dragon scale cloak done for the rider. The ends of the cloak needs to be slightly tattered later once the green stuff has dried. Decided to trim the top part with fur (although i do not know which dinosaur has fur :P) My cloak making is still lacking as im unable to make the folds natural :(

Took the advice from Lord AK and Lord King Kong to have the head facing downwards slightly (what do you all think?) One hand holding a halbred which will be his frost blade. The other hand will be holding chains which will be later on added as reins for his mount.

Again thanks all for view and for your comments.

RiderWipfront

RiderWipside

RiderWipback

Sunday, December 20, 2009

DinoRider WIP

Just a small update. Testing the rider on the dinosaur. I decided to put it in terminator armour but modifying it as the rules do not allow terminator armour to be mounted. But since the lord's gonna have Runic Armour and Belt of Russ then i guess a terminator armoured model would be the best choice :)

Dinoriderwip

**Plus it would take one hell of a marine to subdue this beast!!!***

Friday, December 18, 2009

New Marine army

Thanks to someone who i will not mention here (u know who u r u DEVIL!!!) I was inspired to start a new 40k army based on the Spacewolf codex. But instead of wolves... DINOSAURS reign!!! So here's the conversion of my lord's mount which as u can see is based on the Juggernaut. I have not done the rider yet. Will keep updating as time passes :P

Dinowip3

Dinowip2

Friday, November 27, 2009

Forgeworld Giant Cont. 4

Finally all the parts are glued together and washed with oils. I used burnt umber mixed with black and thinned with white spirits. Areas between the cloth patched were further washed with burnt umber and MIG pigments to give it a dusty weathered look.

giant11

giant13

giant14

Forgeworld Giant Cont. 3

The face of the giant was basically airbrushed with GW's washes. I used the orge flesh for the mid areas. Then the shadows were further darken with the purple wash and red wash. Then the high lights were painted with thinned vallejo flesh color mixed with scab red. At the end a light wash of chestnut ink into the recesses.

The bald spot was airbrushed with bluish grey to simulate the stubble of growing hair and then darkened at areas with a thin wash of black.

The fur on the shoulders was painted german grey and the dry brushed with german grey plus white and dry brushed again with more white added. This was done over a few layers to get to the top color.

giant08

giant09

giant10

Forgeworld Giant Cont. 2

Each panel of the shirt was individually painted with a whole variety of vallejo colors to create a montage of colors which again seen as a whole makes for a consistent and harmonious feel. The reddish patches is there to break the boredom of the browns give abit more contrast. Red was chosen as it is a warm hue which suits with the browns. The back of the model is given the same treatment. A patch on the pants was airbrushed off white with shading to again break the boredom of having too many browns in the model.

giant06

giant07

Forgeworld Giant Cont.

So basic air brushing of the model part would be the most logical choice as it would be better for large surfaces to eliminate the the problem of brush strokes. The body is done in a basic brown color on a black undercoat. All the paints used are tamiya. The face was just a basic color and a few coats of highlighting to bring out the basic structure.

giant04

Some of the parts of the shirt of the model was airbrushed in to give me a basic feel of where the various colors should go. Consideration was needed to ensure the overall consistency of the model so that each part does not overwhelm the whole model. Decided for red sleeves to give a bit more color to the model and this part was the most logical choice as it was a whole piece.

giant05

Forgeworld Giant

Got a commission for a forgeworld giant. I really thought that it was an ugly model... but i changed my mind when painting this model. It is my 1st warhammer fantasy model. So i am abit at a lost to how to get about painting it. So i guess basic patchwork cloth from hides of different animals would be the way to go.

giant01

giant02

giant03

Sunday, October 18, 2009

Terrain

Here's Pix of some terrain which i made for confrontation a while ago. Now its just sitting around collecting dust. May use it for infinity... hmmmm... Need to make alot more though.

Photobucket

hse1

alter1

barrier2

barrier2

Thursday, October 15, 2009

Blast From the Past

My 1st converted and painted terminator. I did 5 of these buggers. This was converted from the old terminators. It began my obsession with BIGGER TALLER BROADER terminators. :P Really need to ween my self off termies... but then came the Wolves!!!

Photobucket

Old Librarian

Looking through my old pix of my minis I found a pix of a librarian which i did for my Deathwing Army. I think my obsession with terminators is really unhealthy. All in all I must have done close to a hundred terminators already :P

Photobucket

Wednesday, October 14, 2009

Pride and Joy of my Marine Army

This is the pride and joy of my marine army. The landraider crusader. I especially like the old landraider with the metal hurricane bolters (A pain in the ass to assemble but it just feels so good).

Im especially proud of the freehand on the sides (which i copied from the 5th ed rule book).

The slight conversion which i made was based on Yellow One's landraider.

landraider2

landraider1

Landraider detail

Droppod

Some old stuff. The drop pod was a dream for me when it first appeared in forge world. An finally a plastic kit!!! I was excited.

droppod2

droppod1

Each skull was freehanded each took me 30 mins!!! I really don't know how i managed to do it. But now it is no longer with me... sold it :( and have not had time to repaint it.

Display Base

Was planning to joining the infinity forum's competition with this display base but unfortunately i sold it before i could take better pix. Ah well....

I was a real joy to make and paint.

Display base

Began with just gluing some random stuff about. Nothing really detailed. 1st try. The most difficult part was using the circle cutter to cut the hole in the middle for the Cutter. Puttied the wall and the floor with Tamiya filler.

Displaybase Painted

The painting was just basic. Air brushed the colors on.

Photobucket

Weathering is abit over done but thats my bad habit just don't know when to stop. :P Used oils and weathering powders to get the stains on the walls and rust on the door.

wip1

wip2

Finally the finished base with the Cutter. This is the only 2 pix which i took of the work coz my collector just bought it before i could even take a better pix.

Finally I'm Blogging!!!

Been tempted to keep a blog on my miniature painting but have just been too lazy. On to the mini's :)

Hac Tao 2

Hac Tao 1

Been painting infinity mini's recently. Must be me missing the good old days of rackham :(

Here's one of my most used mini the Hac Tao with missile launcher.